Documentation
These pages roughly follow the layout of pages within Meditate.
If you're ready to jump right in, here's an overview.
instructions for setting up Meditate to read your site content.
How to use the core editing functionality.
How to set up an approval workflow for your editors.
How to track content versions and roll back to previous versions.
Creating, renaming and deleting collections of content.
How (and when) to use Meditate's built-in FTP interface.
How to add and update Meditate users.
Integrating with a larger admin system
You can embed Meditate into your own system for a single admin interface.
Miscellaneous goodies that don't fit elsewhere.
Complete change histories for each Meditate version.
Things we will change, things we might change, and things we wish we knew how to change.
Quick start
These are the general steps you'll go through in editing a website with Meditate.
- Download the software
You can download the latest version of Meditate here.
- Configure and install the software on your web server
The included install.txt file contains instructions.
- Log in to Meditate
A new installation has a user named "admin" with no password, but you can set a password and add more users when you log in for the first time.
- Select the content to edit
The left sidebar of the Content > Edit page contains hierarchical links to your content. You can click the groupings to open or close them, then click a content name to load it into the editor.
- Edit your content
Standard content editing tools are available at the top of the editor field.
- Save your changes
When you're done editing, look for the Comment field underneath the editor field. Enter a brief comment describing your change. Then set the content status to Published and click Save. At this point the content should appear on your site.
- Review your changes
You can click Content > History to see a complete list of all the edit everyone has made.
Connecting to your site
Meditate can read website content stored in three ways: Contemplate content files, Dreamweaver template files or MySQL database tables. When you install Meditate, you'll configure its access in the config/constants.php file. Read on for more info.
Contemplate content files
If you used the Contemplate™ Web Templating System to build your site, your content might be stored in standard HTML or XML files or a custom database. In this case, edit constants.php to set the CONTENT_TYPE to "contemplate." If you're using the default Contemplate file structure, with your assembler.php script in the contemplate directory and your content files in the content directory, you're done; but you can override these values with the CONTEMPLATE_DIRECTORY and CONTEMPLATE_CONTENT_DIRECTORIES settings.
Dreamweaver template files
Another common approach to web templating is to set up templates with Macromedia Dreamweaver, and then use either Dreamweaver or Contribute to edit your content. Meditate can replace Contribute in this setup (but you would still need Dreamweaver to make global template updates). In this case, edit constants.php to set the CONTENT_TYPE to "dreamweaver," then set DREAMWEAVER_CONTENT_DIRECTORIES to the directory or directories where you've saved your content files. This setting is recursive, so you only need to specify the top-level directories. Meditate will read the files and look for the editable regions inside, and display those for editing.
MySQL database tables
If you've built your own content database or are using a pre-made database, Meditate can connect to that, too. Edit constants.php to set the CONTENT_TYPE to "database," then set the various DATABASE_ settings. These include the standard database connection info (HOST, NAME, USERNAME and PASSWORD), plus a few settings that describe the layout of your database. TABLES is a list of tables where your content is stored. ID1_COLUMN and ID2_COLUMN allow you to set keys for retrieving content. For example, if your content table contains columns for "section" and "page," you would enter those as the ID1_COLUMN and ID2_COLUMN and Meditate will display those values in the editor. Finally, specify the table column that contains the editable content in CONTENT_COLUMN.
If you haven't built your site yet, you can choose from these three approaches for content storage. Here's a brief comparison:
Dreamweaver template files
This is the easiest approach; all you have to do is add <!-- InstanceBeginEditable name="main" --><!-- InstanceEndEditable --> tags around the content in your HTML files that you want to make editable.
Contemplate content files
A Contemplate site is a little harder to set up, but it lets you keep your templates and your content in separate files. This allows you to make site-wide changes to your design by editing just your template files. You can learn more at the Contemplate™ Web Templating System website.
MySQL database tables
Storing your content in a custom database requires the most knowledge and experience, but offers the greatest flexibility in building your site. It's also the best choice if you need to access content in an existing database.
Editing content
Once you've set up Meditate, editing should be straightforward, but here's a guide to the Content > Edit page.
Content browser
In the left sidebar, you'll see a hierarchical ("tree") listing of your content. If it is organized into folders and files, you can click through the folder and file names; if it is organized in a database, you'll click through the row ID values. When you click a content name, that content will load into the editor.
For Contemplate and database content, you will also see a "new field" button that allows you to add new content. This is not available for Dreamweaver content, because you would have to do that at the template level.
Status bar
At the top of the main area, you'll see a status display confirming what content you're editing. When you add new content, this will be an editable field for entering a content name. You may also see a Delete or Revert button depending on the state of your content.
Editor field
The largest element on the page is the WYSIWIG editor, which includes several editing toolbars and your content. You can hover over the toolbar buttons to see their names. The top row of the toolbar includes Undo and Redo buttons, and an HTML button if you need to edit the underlying HTML manually.
Schedule date and time
If you want to publish your content at a future time, you can enter that here. Meditate will store your edits until that time and then publish it automatically. It will also send you an email confirmation when this happens. If you want to publish your content right away, just leave these fields blank.
Comment
It's a good idea to enter a brief description here each time you make a change. This helps other editors see how the content has evolved, and makes it easy to locate the correct content if you need to roll back to a previous version.
Status
Before you save your content, you'll have to set a status to tell Meditate what to do with it:
- In Progress Your content is saved as a draft form so that you can finish working on it later. The content will not appear on the public website.
- In Review Your edit is finished but someone else should review it before publishing it. The content will appear on the Content > Review page.
- Scheduled Your edit is ready to be published, but not until the date and time you entered. If you schedule your content and then decide to publish it right away, you can use the Publish Now link on the Content > History page.
- Published Your edit is finished and you want to publish it right away. This will make your content appear on the website.
Approval workflows
You can set up Meditate so that some users can only make edits within the system, and others have to review the edits before they are published. The key to this functionality is the Role setting on the Users > Edit page. The roles work as follows:
- Editor These users can edit content, but can only set its status to In Progress or In Review. They cannot publish content.
- Reviewer These users can review the content edited by Editors and either publish or undo the changes.
- Administrator These users can do all of the above, plus add users or change the roles of users.
This, then, is the basic approval workflow:
- An Editor logs into Meditate and edits some content. He or she saves the content with a status of In Review.
- A Reviewer logs into Meditate and views the Content > Review page. Each outstanding edit appears here.
- The reviewer can click View to view the edited content, Edit to perform further edits, Publish to publish it, or Revert to undo it.
Version control
Meditate makes it easy to roll back to a previous version of content, if you find a mistake or change your mind about an edit someone has made.
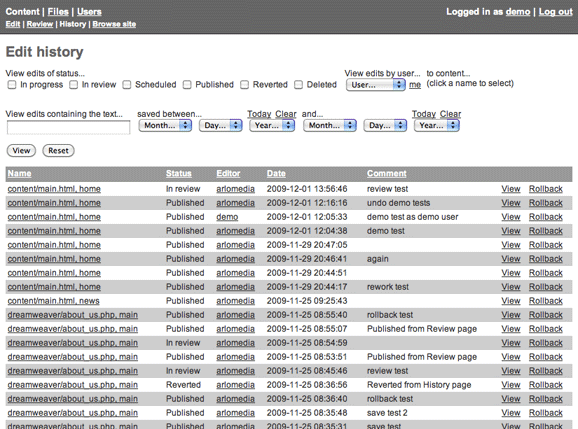
To view previous versions, view the Content > History page. You'll see a list containing the content name, the editor's name, the edit date and the editor's comment for every content edit. You can click View for any version to view it.
If you want to roll back to a previous version, click the Rollback button for that version. Meditate will load that version into the editor. You can then perform further edits if needed, and then publish the content. Your website will not change until you publish, so if you click the Rollback button and then realize you chose the wrong version, you can simply return to the History page and try again.
If you ever use the Rollback functionality, you'll realize how important the editor comments are, so please encourage your editors to enter them as they work!

Managing pages
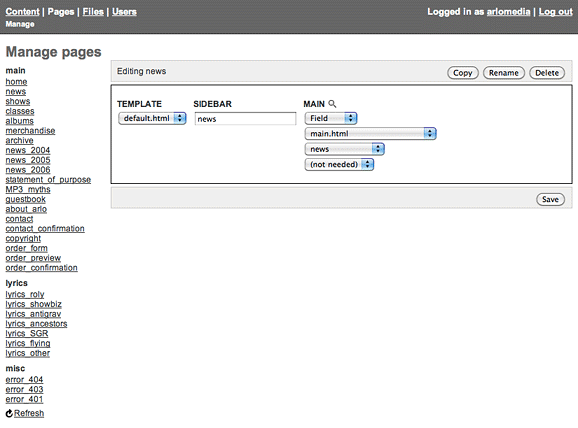
If you're using the Contemplate or Dreamweaver content types, you'll see a menu item called Pages with a Manage page underneath it. This interface lets you manage collections of content that are grouped together on a page.
For Contemplate sites, this interface edits the page definitions contained in Contemplate's pages.txt file. You can edit, rename, copy or delete page definitions. If you place comments into your pages.txt file (a comment is a series of alphanumeric characters beginning with a # character), the page names will be grouped using these comments as headings in the interface.
For Dreamweaver sites, this interface edits the content files themselves. You can rename, copy or delete files. If you specificy multiple directories for your files in the config/constants.php file, the file names will be grouped using these directory names as headings in the interface.
The interface does not have a function to create a new page, because that would require a deeper knowledge of the website development structure. Instead, users can simply copy an existing page and then name the copy.
Since changes in this interface are not subject to version control or rollbacks, this page is only available to Reviewers or Administrators.

Uploading files
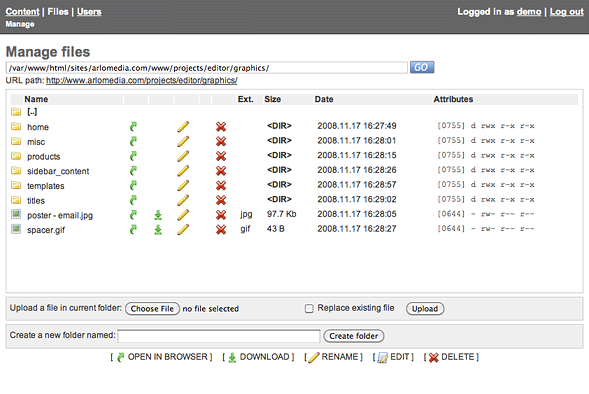
If you want to add images to your content, or link to PDFs or other files, you'll need to upload these files to your website first. You can do this on the Files > Manage page, which provides a built-in FTP interface.
To open a directory, double-click it; to return to the parent directory, double-click the [..] directory.
You can click the icons next to each file to view, download, rename or delete it.
You can also use the buttons underneath the directory view to upload files or create folders.

Managing users
You can set up multiple user accounts in Meditate, with different permission levels. To add a user, click Users > Manage, the click "add a user" under the user list.
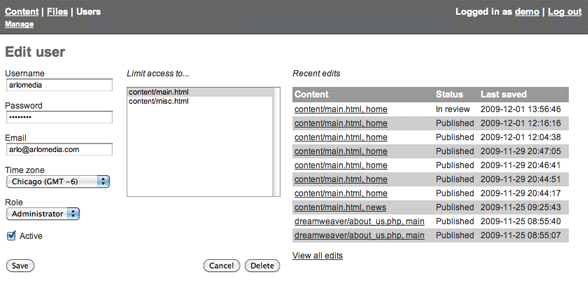
The email address will be used to send confirmations of scheduled content publishing. The time zone will control the date and time display on the Review and History pages.
User roles function as follows:
- Editor These users can edit content, but can only set its status to In Progress or In Review. They cannot publish content. They can upload files from the Files page, but they cannot download or edit files.
- Reviewer These users can review the content edited by Editors and either publish or undo the changes. Like Editors, they can upload files from the Files page, but they cannot download or edit files.
- Administrator These users can do all of the above, plus add users or change the roles of users, and download or edit files from the Files page.
The Active checkbox allows a user to log in. You can disable this option to remove a user's access, but retain their account so that their edits still appear on the History page.
The Limit Access To... list allows you to specify individual files or database groupings that a user may edit. You can select multiple items using the normal multiple-select control key for your computer. If you leave all the items unselected, the user will be able to edit all the items.
And the Recent Edits list is for information only, to provide a quick glimpse of a user's recent activity. You can click View All Edits to see a complete list.

Integrating with a larger admin system
If your website includes functionality that you manage through another administrative interface, you can embed Meditate into that interface so that users can edit content from a single login. This process requires that you can access and modify the source code of your existing admin system and set up a wrapper page. It also requires PHP version 5.3 or higher.
- Confirm that you are running PHP 5.3 or higher on your web server. You can print the value of phpversion() from one of your PHP scripts to check this.
- Open Meditate's index.php file. Comment out the first line and uncomment the two namespace lines at the top of the file.
- Open Meditate's config/constants.php file and set INTEGRATION_MODE to 1.
- Set WRAPPER_PAGE to the directory and page name of a wrapper page in your admin interface. A wrapper is a page containing your system's authentication, navigation and layout code, with an empty space where you'll embed Meditate.
- Check the set of constants beginning with SITE_PROTOCOL. These are normally configured automatically by Meditate, but you will probably have to set them manually to work correctly within your wrapper page.
- Open config/styles.css and remove any styles that conflict with your own styles.
- Open the file in your admin system that contains the login code. At
a point after a user is logged in, set a variable $user_id
to the user's ID and then paste the following code:
$_GET["page"] = "integration_login";
$cwd = getcwd(); // save the current directory so we can return to it later
chdir("[relative path to editor directory]"); // then set the working directory so the editor thinks it's running from its own location
include "pages/index.php"; // load the editor login code
chdir($cwd); // return to the original working directory - Open the wrapper file in your admin system and paste the following code:
$cwd = getcwd(); // save the current directory so we can return to it later
chdir("[relative path to editor directory]"); // then set the working directory so the editor thinks it's running from its own location
include "index.php"; // load the editor index
chdir($cwd); // return to the original working directory - Assuming your wrapper page is named wrapper.html, browse to wrapper.html?page=login to start the installation script. (You can skip this step if Meditate is already installed as a standalone system.) When the installation is done, it will redirect you to your system's login page; log in again.
- Browse to wrapper.html?page=users_manage and set up the editor users. Add your system's user ID to each user record.
- Add menu items to your system for whatever Meditate pages you want to
use:
Content > Edit: wrapper.html?page=content_edit
Content > Review: wrapper.html?page=content_review
Content > History: wrapper.html?page=content_history
Content > Browse: wrapper.html?page=content_browse
Files > Manage: wrapper.html?page=files_manage
Users > Manage: wrapper.html?page=users_manage
Tips and tricks
Pasting content into the editor
It's best to compose within the editor when you can, because you can apply real HTML styles there rather than attempting to use styles carried over from other software. However, if you must paste content from other software, you can do that, too.
Some browsers will show an error message if you paste using your right-click button or the Paste button in the toolbar. In this case, you should be able to paste using a keyboard shortcut (Control-V) or using the Paste as Plain Text button in the toolbar.
And if you're pasting from Microsoft Word, try the Paste from Word button in the toolbar. This strips out lots of garbage formatting that is usually carried over from that software.
Overriding styles in the editor
You can specify your website stylesheets using the SITE_STYLESHEET setting in config/constants.php, and your styles will appear in the editor's Styles menu. But in some cases you may want styles to appear differently in the editor than they do on your website. For example, if you have hidden content that is activated on the site by a rollover or button click, you would want to see it all the time in the editor. Or you might want to show the outlines of columns or boxes to make editing easier. In this case, you can set up an additional stylesheet that overrides or augments your styles, and include it in the SITE_STYLESHEET setting after your public stylesheets.
Customizing the appearance of Meditate
You can brand Meditate or just tweak its appearance by editing the files in the config directory. The header.php and footer.php files contain code that is applied to every page; the header.php file also contains the menu at the top of each page. The head.php file contains script and stylesheet links that are applied to every page. And the styles.css file contains all the text styles and most of the page layout information.
Release notes
If you need to know exactly how Meditate has changed from one version to the next, or would like more insight into the development and functionality of the tool, please review the release notes:
Known issues
None at this time.
Next steps
The next major release will add an interface for editing Contemplate's pages.txt file, so that users can more easily add new pages to a site.
Wish list
None at this time.